The other day a question was posed. “How do I change the color of pages in a Word Document?” That’s a no-brainer, I thought. Simply do the following:
Design→Page Background Group→Page Color
“Almost!” The person replied, “But I want to change different pages to different colors.”

Smugly, I responded, “No Problem. We will just insert Section breaks and change the colors of each section.”
Sigh…always something.
I wasn’t smug for very long!! It didn’t work. Oops…Life of a Microsoft Instructor…
Feeling a bit chagrined but undaunted, I set out to find a workaround. It turns out that others have been frustrated by this as well. After a bit of experimentation, I feel the following is a good workaround.
Anyway, here’s my solution.
You are not going to change the color of the page, but you will create a rectangle the size of the area that you wish to be colored and then you will send it behind the text. In this instance, the size will NOT include the header and footer area. We will have to do this separately to ensure the content is not hidden.
NOTE: If you start in the header section you can color the entire page in ONE rectangle. TRUE. BUT…there’s always a but…it is harder to edit the content because it is “behind “ the header footer. Let me know if you find otherwise.
After that we will create section breaks so we can format each header and footer separately (different colors) This may be overkill. You may not need to color code the headers and footers, but I am going to include it in this blog since there have been questions regarding this.
Download the file below if you want to use an example file to follow along.
Here we go!
Change Page Color
- Place your cursor in the page for which you want to change the color
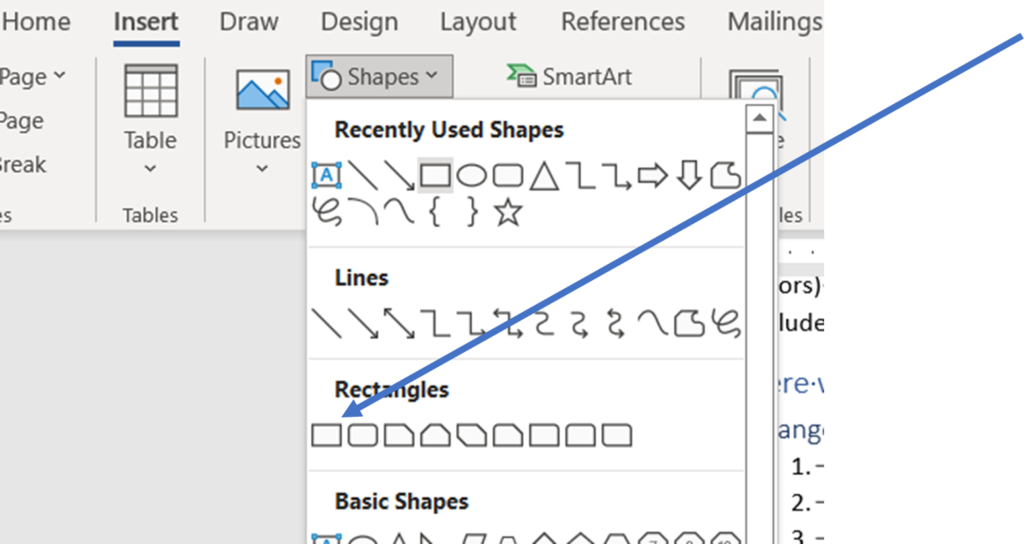
- Choose Insert→Shapes→Choose a rectangle
Drag the mouse to draw a rectangle as large as the Word page—DO NOT INCLUDE Header/Footer area unless there is no content in either as you will not be able to see the content.

- Format Ribbon→Shape Format→Shape Fill drop-down
- Choose a Fill Color
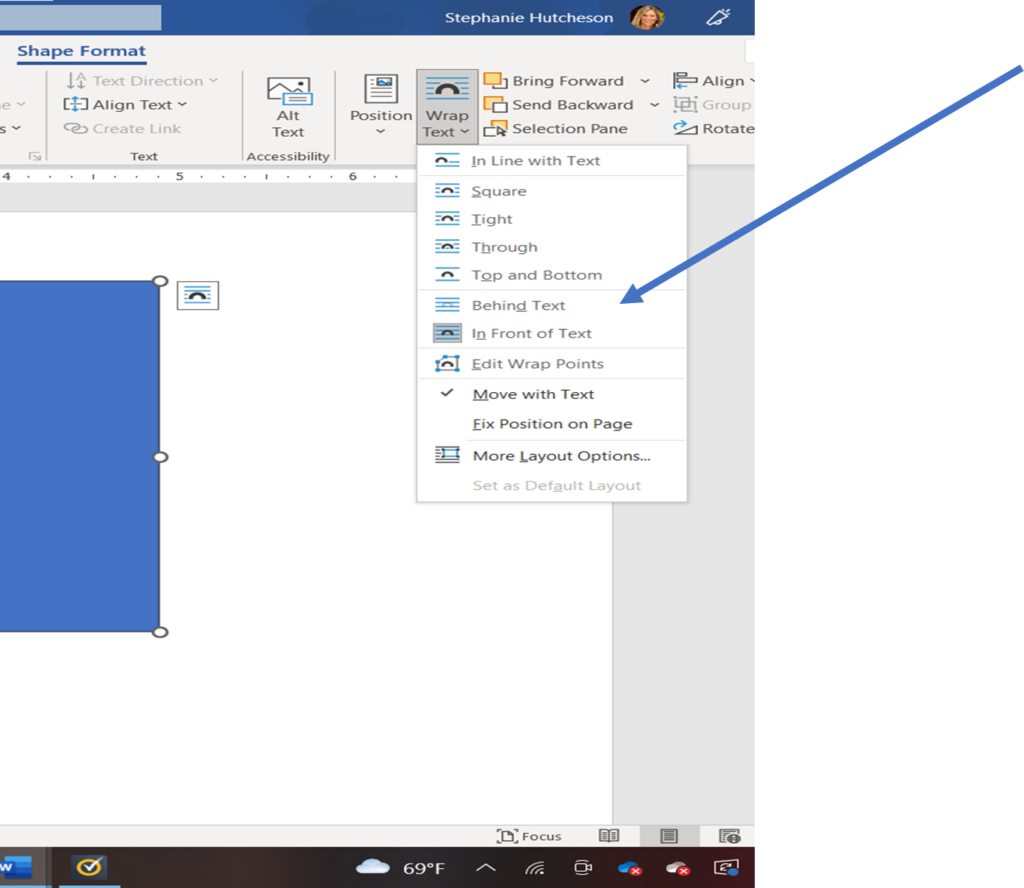
With the Rectangle Selected; Choose Shape Format→Arrange→Wrap Text→Behind Text

- You should now see your page content

If you chose to color the entire page including the header and footer areas, you are good to go! However, if you want to see the header/footer content you must do this separately. I used different colors to show you that I did these individually. You would probably want to use the same color for all.
Change Header/Footer Color
Before we begin, we need to do some setup. When you create headers and footers they will automatically appear on every page. Obviously, we do not want the color that we apply to the header and footer to apply to every page.
We will have to add a SECTION BREAK so that we can create independent Headers and Footers
NOTE: This can be a problem if you need to change your header footer content.
Make sure you first create your header and footer content. Once you complete the following steps the header and footer sections will no longer be linked. If you have a large document, you will have to edit sections individually. This is where you may decide that changing the BODY of the document is fine, vs including the headers and footer.
Create a Section Break and Unlink your Headers and Footers
I added one at the bottom of pages 1, 2, and 3.
- Place your cursor where you want to add a section break
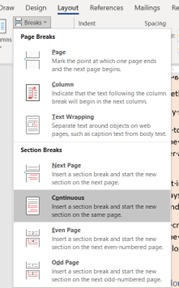
- Layout→Page Setup→Insert Page and Section Breaks→Continuous

- Scroll to the next page and double-click in the footer section if necessary
- Choose Header & FooteràNavigationàLink to Previous (make sure it is not selected)
The footer in this section will no longer be linked to the previous section’s footer. Note the footer on the first page now displays the text Footer – Section 1 and the footer on the second page now displays the text—Footer Section 2.
Create the footer color
- Select the footer section in which you want to change the color
- Choose Insert→Shapes→Choose a rectangle
- Drag the mouse to draw a rectangle in the footer section. (This may take some back and forth)
- Format Ribbon→Shape Format→Shape Fill drop-down
- Choose a Fill Color
- With the Rectangle Selected; Choose Shape Format→Arrange→Wrap Text→Behind Text
- You should now see your footer content
Repeat the above instructions for the Header area.
The Solution Page contains Three Examples
- The first colored page uses the above directions but uses different colors in each area.
- The second colored page uses the above directions using the same color everywhere (Try File→Print to see it blend well. Or save it to a PDF to see the results)
- The third colored page colors only the body of the page.
PUT (Power User Tip)
If you use color changes frequently think about creating a template!
Stephanie’s Thoughts: If you don’t need to edit this document again (e.g. you convert it to a PDF for distribution) then you can save steps by creating your section breaks first, then unlinking the Header/Footer sections, and then create the rectangle in the header section and drag it all the way down.
Did this work? Do you have suggestions to add to my instructions? Reach out! I love hearing from my Power Users. I like hearing other thoughts. 😊
 Arena Training